此篇以Ubuntu下的AT89S52,S51+SDCC+USBASP的开发环境搭建来进行说明。 系列说明:LINUX下程序开发具有一定的成熟性,但是对于跨平台的包括部分的MCU,FPGA还并未被广泛使用,本系列将针对51系列的MCU.跟大家分享下。
环境如下:
OS系统 : ubuntu 12.04
编译器 : sdcc
烧录软件 : avrdude
烧录器件 : usbasp
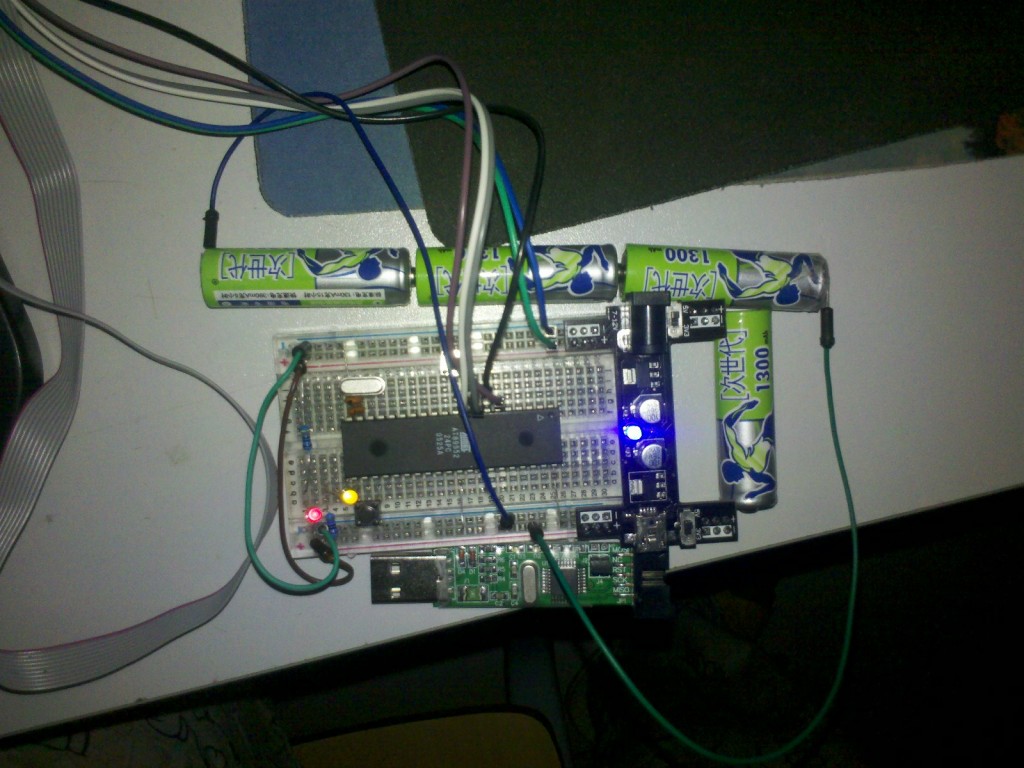
开发板的确是有个小的,不过这意搭接了一个个人的小面包板版本。
如下图:
注:旁边的小板子是USBASP,也有供电功能~此处就放在那里做个合影 。
软件准备工作:
软件安装,软件安装建议使用ubuntu的软件中心,比较方便。需要sdcc,avrdude即可了。文本编辑什么都行。也可以集成在codeblocks和eclipse里面,ubuntu下有个51MCU的IDE,可以下来用‘mcu8051ide’。
对于命令行可以如下安装。对于一些附带库和文档自行选择即可~
1
2
sudo apt-get install avrdude sudo apt-get install sdcc
测试开始
1 2 3 4 5 6 7 8 9 10 11 12 13 14 15 16 17 18 19 20 #include <8052.h> typedef unsigned int size_t ; #define LED P0_0 void delay (size_t t) while (t--); } void main () while (1 ) { LED = 0 ; delay (20000 ); LED = 1 ; delay (20000 ); } }
这是一个很简单让一个小灯blink的程序。
编译:
之后就要编译程序把程序变成单片机能使用的*.elf *.bin *.hex之类
这里使用的是SDCC默认编译出现的*.ihx (intel hex)
在当前目录下执行
-mmcs51 也可以-默认
配置avrdude:
使用avrdude烧写
我们不能直接使用avrdude烧写,这是因为它默认只支持AVR芯片,但是通过一些配置,我们可以使用它来烧写。
对于8051芯片,有三种配置文件,分别适用于不同的型号。看看你要哪一种,然后复制到/etc/avrdude.conf并保存。
sudo gedit /etc/avrdude.conf
For AT89S51
1 2 3 4 5 6 7 8 9 10 11 12 13 14 15 16 17 18 19 20 21 22 23 24 25 26 27 28 29 30 31 32 33 34 35 36 37 38 39 40 41 42 43 44 45 46 47 48 49 50 51 part id = "8052" ; desc = "AT89S51" ; signature = 0 x1E 0 x51 0 x06; chip_erase_delay = 500000 ; pgm_enable = "1 0 1 0 1 1 0 0 0 1 0 1 0 0 1 1" , "x x x x x x x x x x x x x x x x" ; chip_erase = "1 0 1 0 1 1 0 0 1 0 0 x x x x x" , "x x x x x x x x x x x x x x x x" ; timeout = 200 ; stabdelay = 100 ; cmdexedelay = 25 ; synchloops = 32 ; bytedelay = 0 ; pollindex = 3 ; pollvalue = 0 x53; predelay = 1 ; postdelay = 1 ; pollmethod = 0 ; memory "flash" size = 4096 ; paged = no; min_write_delay = 4000 ; max_write_delay = 9000 ; readback_p1 = 0 xff; readback_p2 = 0 xff; read = " 0 0 1 0 0 0 0 0" , " x x x a12 a11 a10 a9 a8" , " a7 a6 a5 a4 a3 a2 a1 a0" , " o o o o o o o o" ; write = " 0 1 0 0 0 0 0 0" , " x x x a12 a11 a10 a9 a8" , " a7 a6 a5 a4 a3 a2 a1 a0" , " i i i i i i i i" ; mode = 0 x21; delay = 12 ; ; memory "signature" size = 3 ; read = "0 0 1 0 1 0 0 0 x x x 0 0 0 a1 a0" , "0 0 0 0 0 0 0 0 o o o o o o o o" ; ; ;
For AT89S52
1 2 3 4 5 6 7 8 9 10 11 12 13 14 15 16 17 18 19 20 21 22 23 24 25 26 27 28 29 30 31 32 33 34 35 36 37 38 39 40 41 42 43 44 45 46 47 48 49 50 51 part id = "8052" ; desc = "AT89S52" ; signature = 0 x1E 0 x52 0 x06; chip_erase_delay = 500000 ; pgm_enable = "1 0 1 0 1 1 0 0 0 1 0 1 0 0 1 1" , "x x x x x x x x x x x x x x x x" ; chip_erase = "1 0 1 0 1 1 0 0 1 0 0 x x x x x" , "x x x x x x x x x x x x x x x x" ; timeout = 200 ; stabdelay = 100 ; cmdexedelay = 25 ; synchloops = 32 ; bytedelay = 0 ; pollindex = 3 ; pollvalue = 0 x53; predelay = 1 ; postdelay = 1 ; pollmethod = 0 ; memory "flash" size = 8192 ; paged = no; min_write_delay = 4000 ; max_write_delay = 9000 ; readback_p1 = 0 xff; readback_p2 = 0 xff; read = " 0 0 1 0 0 0 0 0" , " x x x a12 a11 a10 a9 a8" , " a7 a6 a5 a4 a3 a2 a1 a0" , " o o o o o o o o" ; write = " 0 1 0 0 0 0 0 0" , " x x x a12 a11 a10 a9 a8" , " a7 a6 a5 a4 a3 a2 a1 a0" , " i i i i i i i i" ; mode = 0 x21; delay = 12 ; ; memory "signature" size = 3 ; read = "0 0 1 0 1 0 0 0 x x x 0 0 0 a1 a0" , "0 0 0 0 0 0 0 0 o o o o o o o o" ; ; ;
For AT89S8253
1 2 3 4 5 6 7 8 9 10 11 12 13 14 15 16 17 18 19 20 21 22 23 24 25 26 27 28 29 30 31 32 33 34 35 36 37 38 39 40 41 42 43 44 45 46 47 48 49 50 51 52 part id = "8253" ; desc = "AT89S8253" ; chip_erase_delay = 20000 ; pgm_enable = "1 0 1 0 1 1 0 0 0 1 0 1 0 0 1 1" , "x x x x x x x x x x x x x x x x" ; chip_erase = "1 0 1 0 1 1 0 0 1 0 0 x x x x x" , "x x x x x x x x x x x x x x x x" ; timeout = 200 ; stabdelay = 100 ; cmdexedelay = 25 ; synchloops = 32 ; bytedelay = 0 ; pollindex = 3 ; pollvalue = 0 x53; predelay = 1 ; postdelay = 1 ; pollmethod = 0 ; memory "flash" size = 12288 ; paged = no; min_write_delay = 4000 ; max_write_delay = 9000 ; readback_p1 = 0 xff; readback_p2 = 0 xff; read = " 0 0 1 0 0 0 0 0" , " x x a13 a12 a11 a10 a9 a8" , " a7 a6 a5 a4 a3 a2 a1 a0" , " o o o o o o o o" ; write = " 0 1 0 0 0 0 0 0" , " x x a13 a12 a11 a10 a9 a8" , " a7 a6 a5 a4 a3 a2 a1 a0" , " i i i i i i i i" ; mode = 0 x21; delay = 12 ; ; memory "signature" size = 2 ; readback_p1 = 0 x1E; readback_p2 = 0 x73; read = "0 0 1 0 1 0 0 0 x x x x x x x x" , "x x 1 1 0 0 0 a0 o o o o o o o o" ; ; ;
特意要说明一下的是,网上有些配置在S51和S52的delay的参数上给的20000,这个delay太短了,在验证代码的时候会出错。因此还是建议用如上的配置。
使用avrdude烧写:
配置完成后要用main.ihx进行烧写,在终端执行make program
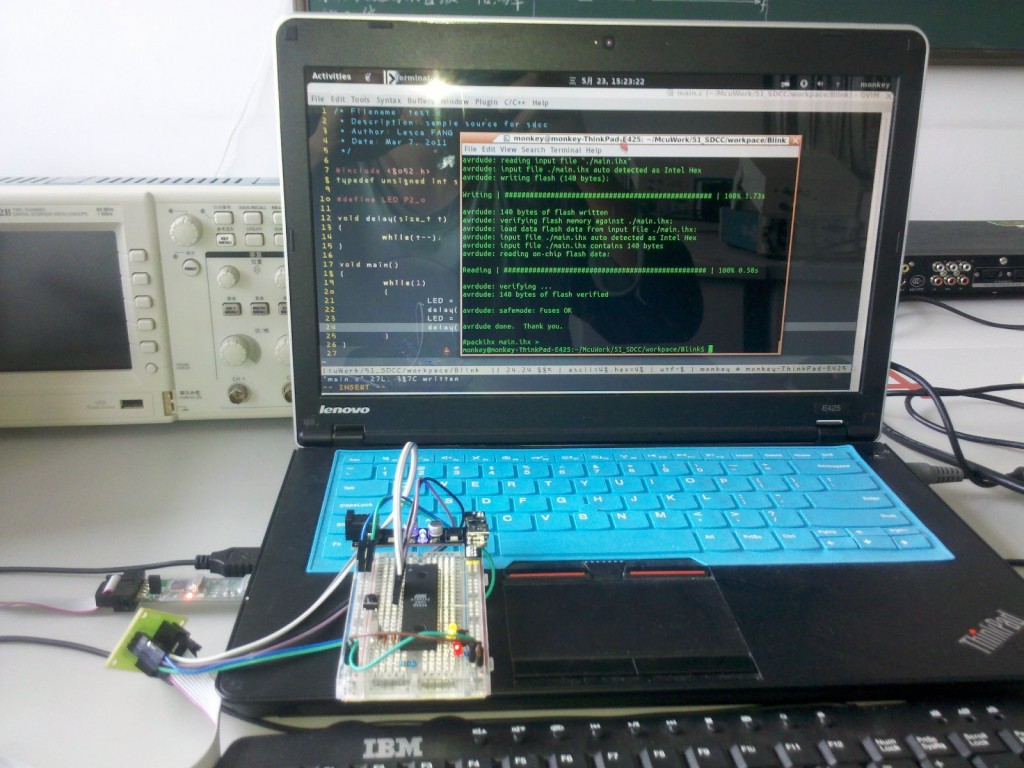
1 2 3 4 5 6 7 8 9 10 11 12 13 14 15 16 17 18 19 20 21 22 23 24 25 26 27 28 29 30 31 32 33 34 monkey@monkey-ThinkPad-E425:~/McuWork/51 _SDCC/workpace/Blink$ make program sudo avrdude -p 8052 -c usbasp -e -U flash:w:'./main.ihx' avrdude: warning: cannot set sck period. please check for usbasp firmware update. avrdude: AVR device initialized and ready to accept instructions Reading | ################################################## | 100 % 0.01 s avrdude: Device signature = 0x1e5206 avrdude: erasing chip avrdude: warning: cannot set sck period. please check for usbasp firmware update. avrdude: reading input file "./main.ihx" avrdude: input file ./main.ihx auto detected as Intel Hex avrdude: writing flash (140 bytes): Writing | ################################################## | 100 % 1.69 s avrdude: 140 bytes of flash written avrdude: verifying flash memory against ./main.ihx: avrdude: load data flash data from input file ./main.ihx: avrdude: input file ./main.ihx auto detected as Intel Hex avrdude: input file ./main.ihx contains 140 bytes avrdude: reading on-chip flash data: Reading | ################################################## | 100 % 0.57 s avrdude: verifying ... avrdude: 140 bytes of flash verified avrdude: safemode: Fuses OK avrdude done. Thank you. monkey@monkey-ThinkPad-E425:~/McuWork/51 _SDCC/workpace/Blink$
选项说明(Options):
avrdude文档
1
2
3
4
5
6
7
8
-p specifies the type of the MCU connected to the programmer. -c specifies the default programmer -e causes a chip erase to be executed. -U memtype:op:filename The op field specifies what operation to perform: r read device memory and write to the specified file w read data from the specified file and write to the device memory v read data from both the device and the specified file and perform a verify
总图:
使用USBASP前请用lsusb查看一下是否能检测到。并且注意STC的串口软件没有在linux下版本,USBASP使用的是ISP接口,对于AT89C51,AT89C52是无法使用的切记。
USBASP是开源的一款硬件,USBASP制作
USBASP固件 (以防有的固件比较老不支持)
附录:
单源文件简易Makefile
make : 编译
make hex : 生成*.hex
make program : 烧录
1 2 3 4 5 6 7 8 9 10 11 12 13 14 15 16 17 18 19 20 21 22 23 24 25 26 27 28 29 30 31 32 33 34 35 36 37 38 CC=sdcc SOURCE = $ (wildcard *.c) all : $ (CC) -mmcs51 $ (SOURCE) hex: packihx '$(wildcard *.ihx)' > '$(patsubst %.ihx,%.hex,$(wildcard *.ihx))' program : sudo avrdude -p 8052 -c usbasp -e -U flash:w:'./$(wildcard *.ihx)' .PHONY: clean clean: rm -f *.bak rm -f *.rel rm -f *.asm rm -f *.lst rm -f *.sym rm -f *.map rm -f *.lnk rm -f *.mem rm -f *.i rm -f *.d rm -f *.rst